|
The topog macro module used in Figure 12 is identical to the topog module used in the first visualisation, shown in Figure 6, used to generate the terrain of Australia coloured by elevation.
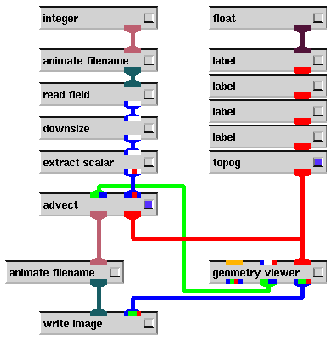
The main network for this visualisation, shown in Figure 12, has delegated most of the real work to the advect macro module. The main network in this case simply reads in a single field file (at a particular timestep, specified by the integer at the top left), displays the time of this timestep (using the float at the top right) and various other context information (the labels and topog along the right), and outputs the frames to image files using the write image module. The field file read has the temperature extracted from it with the extract scalar module, which is then fed to the advect module.
The advect macro module, shown in Figure 13, accepts as input a 3D scalar field (the temperature) and an upstream_transform struct, used to tie the Geometry Viewer to the particle advector module within the advect module. The advect module outputs the geometry of the scene and an integer indicating the current frame number, suitable for using with an animated filename when saving frame image files.
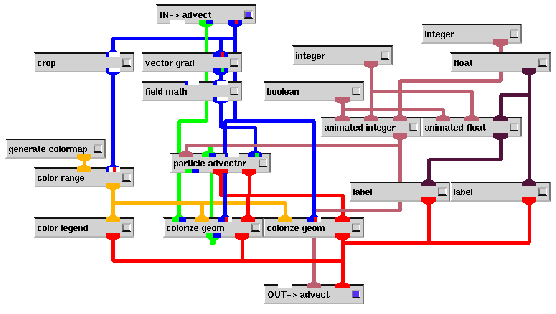
The advect module creates its colourmap by cropping out the highest
horizontal slice plane in the ![]() direction, which has some erroneous temperature
values in it, and then colouring accordingly. The colourmap has been created
so that temperatures above
direction, which has some erroneous temperature
values in it, and then colouring accordingly. The colourmap has been created
so that temperatures above
![]() are orange and yellow,
temperatures between
are orange and yellow,
temperatures between
![]() and
and
![]() are green, and temperatures below
are green, and temperatures below
![]() are blue
in colour. The temperature's gradient is computed with the vector grad
module, and since it normally flows from low values (ie. cold) to high values
(ie. warm) it is then passed through the field math module to multiply
all the field's values by
are blue
in colour. The temperature's gradient is computed with the vector grad
module, and since it normally flows from low values (ie. cold) to high values
(ie. warm) it is then passed through the field math module to multiply
all the field's values by ![]() , making the field flow from warm values
to cold values, as desired.
, making the field flow from warm values
to cold values, as desired.
This gradient is then passed into the particle advector module, which has been synchronised to the animated integer on the right. This means that the particle advector module will only advance the positions of the particles when the value of the animated integer changes. This allows the individual frames of the particle advection to be saved as separate image files.
The particle advector module has input ports to support colouring the output geometries, however, it always colours the output geometries according to their speed through the vector field. This is undesirable, what is wanted is to colour the output geometries according to their actual temperatures. This is achieved through the use of the colorize geom modules, which colour their input geometries according to the scalar field they are given -- the actual temperature at each point, which works quite well. The particle advector module outputs two geometries, the particles themselves and their streamline ``tails''. Both are colourised in exactly the same way.